A lot of folks in the blogosphere like to celebrate their 100th post. I noticed this a lot on the Giveaway Day. Many people had saved their giveaways in honor of their big 1-0-0. I quickly checked my count and realized I was already up to 148! Who knew? I have been working on a tutorial and thought that would be a great sesquecentenial post, however I am having trouble getting more than 4 photos in a single post. Any tips?
So, for this post, this, my 150th post, I am going to create a 'tag'. You know those things where you have to answer the questions and then pass it along. This is a photo tag. I tag everyone in the entire blogosphere MWAH HA HA! (deep breath).
Here are the rules. You must not use a car. You must not change (clean) your surroundings. Pick up your camera and take pictures of the following:
1. Your kitchen.
2. Something in your house that is red.
3. The view from your front door.
4. Something outside that you can walk to (no car!).
5. One of your meals today.
Yes, this is completely random but I have been thinking about the photo tag thing for awhile ever since my friend, Angi, posted pictures she took on a walk around her neighborhood. There is something very insightful about a person's surroundings.
Please comment on this post when you have done it so I can check out your photos! And stay tuned for my first tutorial. . .and my photos. . .where did Chris put the camera?
Wednesday, December 17, 2008
Sesquecentenial Post
Posted by Meg at 9:15 AM 4 comments
Friday, December 12, 2008
Reversible/Adjustable Party Hat TUTORIAL
Here it goes, my first tutorial. I hope it makes sense, let me know if you have any questions or suggestions. I am sure there are better ways to to do this, but I kind of made it up as I went so there you go. Sorry, Anna (giveaway winner), you got my first trial so yours in not really reversible, and is a little small. I got at least a little better. Here we go!
1. Cut out four circles of fabric and two circles of interfacing. All should be the same size. You can vary the color and prints for the fabric. Here I have a strip and animal print that i will use for one side and two polka dot circles that will be the reverse side of the hat.
2. Fuse the interfacing to one set of circles (should be both circles of one side. . .for me, I fused to the polka dots). You can interface all four circles but I have some thick stuff right now and my first hat turned out rather thick (sorry, again, Anna).
3. Pin, then sew one circle from each side to one circle from the reverse side (right sides together). For me, this meant I attached a polka dot to the stripey circle and the other polka dot was sewn to the animal print. Leave a 2 inch space to turn the circles back. Back stitch on each side of your 2 inch gaps.
4.Trim close to your seam with pinking shears (if you have them) and then turn your circles right sides out through the gap you left.
You don't need to worry about stitching the gap closed just yet.
5. Turn your circles so the 'front side' is facing up (for me that is the stripes and animal) and overlap one circle onto the other by about 1/3. Make sure that the 2 inch gap you left is part of 


When you sew the circles together you will close the gap you turned them right-side-out through. Just make sure that the seams are tucked (or pressed) in.


 8. If you didn't glue the flap before sewing you will have to glue the top now. It is darn near impossible to sew all the way up to the tippy top, so just go as far as you can, rolling and scrunching the hat as you go and then take the easy way out. . .glue the last two inches.

15. You are done! You can reverse your hat and have a tassel on each side. And you can adjust the hat for a smaller noggin by folding up the 'cuffs' at the bottom edge like this sidewise picture shows.

Now make a bunting and napkins and give it as a 'birthday' gift to family and friends.
Posted by Meg at 11:15 AM 2 comments
Sunday, December 7, 2008
And the Winner Is. . .
Anna from Anna's Nest. Her blog is amazing so you should check it out.
I tried to link it on here but it isn't working. Try annasnest.com you won't be sorry!
I also should say that I was lucky enough to win 2 patterns from Kekya Lou's etsy shop. I am very excited to try them out. Thank you to everyone who entered my giveaway. I hope I can do another one soon. It was sure fun to see so many comments on my post! Good luck with holiday shopping (or crafting). I am really having a hard time typing after driving almost 400 miles today. I think I should sleep and try again later when I can spell.
Posted by Meg at 7:53 PM 4 comments
Tuesday, December 2, 2008
Happy Birthday GIVEAWAY!!!
It is Giveaway day in Blogland. Go to Sewmamasew.com (click on blog) to check out the master list of the handmade giveaways today. I think there is something very valuable and endearing about something that has been made by hand. It is unique, it is worked, it is special. What better than a handmade item to celebrate the unique and special people in our lives. I am talking about birthdays people!
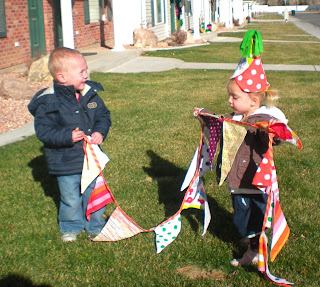
I am giving away a fabric celebration bunting and a special birthday hat. The banner has multi-colored and patterned triangles that will surely make any party more festive. It is trimmed with stripes cut on the bias so you can stretch it from the rafters and party like its 1999, only greener!
The party hat has coordinating fabric and a jaunty 100% wool tassel on the top. It is sure to make any child the captain (or princess ) for the day. Also, the colors for both the banner and the cap are gender neutral so bring on the boys!
TO ENTER:
Leave a comment ON THIS POST. I thought to require you answer a question but I couldn't think of a clever one. Instead, if you leave a clever comment I will put your name in twice.
I will hold my random drawing of those who entered on Sunday, December 7. Good Luck and Happy Birthday to those December birthdays (like my grandma, my cousin, Jesus Christ, and many others!)
Posted by Meg at 9:05 PM 195 comments


